Activity Center is a Reeher best practice module that can be added to a customer’s Platform subscription if they are currently a subscriber to the Major Giving layer of the Platform. This module allows users to create contact reports and schedule tasks to help manage their relationships with prospects.
Activity Center is a contact management system designed to:
- Create stronger constituent relationships
- Simplify the process of filing contact reports
- Prompt the officer to stay in touch with their relationships
- Formalize and automate a system for follow up and reminders
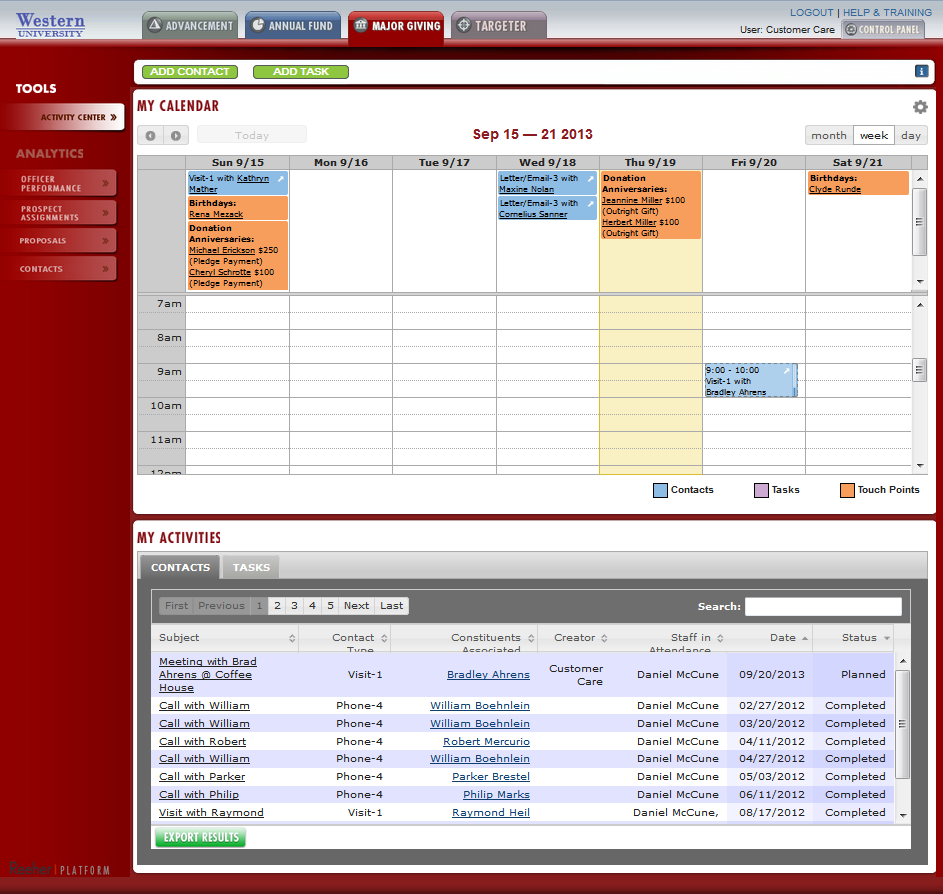
When enabled, this module provides your institution with a new section within the Major Giving layer called Tools, which contains the Activity Center Tab. All the other reporting tabs (e.g. Officer Performance, Prospect Assignments, Proposals, and Contacts) will appear under a section called Analytics. In addition, enabling this module also allows users to create contacts and tasks within the Activities tab in a constituent’s Relationship Profile. The Activity Center also will add several features within Reeher Mobile that will allow users to create contacts and tasks through their mobile device, as well as, view their calendar of Touch Points, Contacts, and Tasks.
The core components of the Activity Center tab are:
- Add Contact: Used to add a new contact report.
- Add Task: Used to create a new task.
- My Calendar: This section displays Touch Points, Contacts, and Tasks for the officer.
- My Activities : This sections displays all the Contacts and Tasks associated with the officer.
- FAQ: Frequently Asked Questions about Activity Center.
Creating a Contact
Clicking on the Add Contact button will open up a dialogue box called Create New Contact, which will allow you to create a new contact record. The user that creates the contact will be considered the contact Creator and this will be recorded automatically. Below is a summary of each field and how each field works.
- Constituents Associated. This field is used to specify the constituent that is being contacted. To associate the constituent to your contact report you can start typing the constituent’s name. This will automatically search for the constituent and provide you with a choice of constituents. Select the appropriate constituent from this list to add the constituent to your contact report. Additional constituents can be added to the contact report by repeating the process.
- Staff in Attendance. By default the user creating the contact report will be added to the contact record. You can add additional staff members by clicking in the text box and selecting other staff members.
- Type. This is the type of contact. These types are based on the information that is provided in your nightly feed.
- Date. This should be that the date that the contact occurred or is planned to occur. If the contact is time sensitive then you can also add the Start and End times of the contact, but the time information is not required.
- Purpose. Select the purpose of the contact. The purpose values displayed are based on what your institution has provided from within the nightly feed.
- Status. If the contact is scheduled for the future then you can select Planned. If the contact has happened then you can select Completed. Only Completed contacts will appear in the reporting within the Analytics section of the Major Giving layer.
- Subject. This space is provided to provide a short summary of the reason for the contact.
- Description. This field is used to submit the substantive information that your institution requires be recorded as it relates to completing a contact report.
Once you’ve completed entering in the contact information then you can click on Submit. Once you submit the contact record it will be available in several places. Those include My Calendar; within the Contacts tab of My Activities; and within the Activities tab of the Constituent’s Relationship Profile. If the Contact’s status has been set to Completed then it will also be displayed within the contact related viewports within the Major Giving and Advancement Executive layers.
Creating a Task
Clicking on the Add Task button will open up a dialogue box called Create New Task, which will allow you to create a new Task. Tasks can be used to schedule reminders for you or to assign other users tasks. These can be associated with a constituent, but they can also be used to assign tasks that are not associated with a constituent. Below is a summary of each field and how each field works.
- Task Owner. This field should be used to select the user that is responsible for completing the task. By default it will select the user that is creating the task. However, you can select another Platform user that has access to Activity Center.
- Constituents Associated. This is not a required field, but if you can associate a constituent to the task if that is relevant. Begin by typing the constituent’s name which will then search and find the constituents with similar names. Then you can select the individual from the list to associate the constituent to your task.
- Due Date. This is the date that the task is Due. If the task is time sensitive then you can also add the Start and End times of the task, but the time information is not required.
- Status. Select Planned if the task is due in the future and select Completed once the task has been completed.
- Subject. This field should be used to summarize the purpose of the task and what needs to be completed.
- Description. This field should be used to enter any additional relevant information in regards to the task.
Once you’ve completed entering in the task information then you can click on Submit. Once you submit the task there will be several things that occur. First, the task record will be displayed within the Task tab in the My Activities section. If you’ve assigned the task to another user then that user will receive an email alerting them to the new task assignment. When they log into the Activity Center they will also see a tool tip that alerts them to the new task assignment where they can accept it.
As the creator of the task you will receive an update as to when the task has been accepted, declined, or completed. These tasks will also appear in the Tasks tab of the My Activities section if you are the creator of the task or the task owner.
My Calendar
The My Calendar section displays Touch Points, Contacts, and Tasks. By default you the calendar will display the current week’s activities. Activities that are not associated with a specific time are located at the top of the page. Activities that have a start and end time are displayed in the lower portion of the calendar.
The calendar contains several features that will help you to better manage your prospects and discover meaningful moments to reach out to them. There are also several helpful navigational elements that will help you to get the view you need by month, week, or day. In addition, from the month or week view you can click on the white space within any day column and drill into the day view.
The following two sections summarize the primary purpose and features of the calendar as it displays Touch Points and Contact/Task information.
Touch Points
Touch Points are generated by the Reeher Platform and are meant to provide awareness to key moments where reaching out to your prospects could be warranted. There are several types of Touch Points. They include:
- Birthday. Displays assigned prospects birthdays.
- Milestone. Displays your prospects with they reach certain giving milestones.
- Donation. Displays when a constituent makes a donation.
- Donation Anniversary. Displays the one year anniversary of a prospects donation.
You have control over the types of Touch Points that display on the calendar as well as the type of assignments that you see Touch Points on within your portfolio of prospects. You can control this by clicking on the gear image located on the upper right hand corner of the My Calendar section and selecting Settings.
Contacts & Tasks
Contacts and Tasks will appear on the calendar if you are the creator, owner, or listed as staff in attendance. The constituent name is identified in the calendar within the blue box for Contacts and the purple box for Tasks. Clicking on the constituent name will open up the constituent’s Relationship Profile. If you click on the arrow, located in the upper right hand corner of the Contact or Task box then it will open the dialogue box to view the Contact or Task form. This will allow you to edit, delete, or print the contact or task form.
My Activities
My Activities, located under My Calendar within the Activity Center, displays all the Contacts and Tasks associated with you. The activities are separated into a tab for Contacts and a tab for Tasks.
Contacts
The Contacts tab displays all of the contacts where you have been identified as the Creator or as Staff in Attendance. This includes all contacts created within the Reeher Platform or from your institution’s donor management system.
The table by default is sorted by date with planned activities being displayed in advance of Completed contacts, so that you can see what is coming up. If the contact is Planned, but the Date is in the past then the record will also be highlighted in red to indicate that you need to take action and move the date or complete the contact.
By clicking on the Subject in the table you can view the contact form and edit, delete, or print the contact record.
The Search feature located at the top of the Contacts table will allow you to search the contact reports by Subject, Contact Type, Constituents Associated, Creator, and the Staff in Attendance fields. In addition, this search allows you to search through the Description field.
Tasks
The Task tab displays all of the tasks where you have you are the Task Owner or Creator. The table by default is sorted by date with planned tasks being displayed in advance of pending or completed tasks. If the task is Planned, but the Date is in the past then the task record will be displayed in red to indicate that you need to take action and move the date or complete the task.
By clicking on the Subject in the table you can view the task form and edit, delete, or print the task record.
The search feature allows you to search the task records by Subject, Constituents Associated, Creator, and Task Owner. The search feature also searches through the Subject and Description fields associated with your tasks to help you quickly find what you are looking for.
Frequently Asked Questions
The following FAQ only relate to contact records created through Activity Center within the Reeher Platform and do not relate to activities managed in your institution’s donor management system and provided to Reeher in the nightly data feed.
How does Activity Center work?
Activity Center displays all of the completed contacts that your institution provides to Reeher in the nightly data feed from your donor management system. Contacts and tasks that are created within the Reeher Platform must be edited within the Platform. Any contact records imported from your donor management system cannot be edited within the Reeher Platform. Your institution will have a choice of bringing that information back into your donor management system when the Activity Center module is implemented, but if they contacts and tasks are created within the Reeher Platform then they must be managed from the Platform.
Who can edit a contact or task record?
In order to edit a Contact Record within the Reeher Platform you must be the Creator, be listed as Staff in Attendance, or be given administrative access to edit activity information.
In order to edit a Task Record within the Reeher Platform you must be the Creator, Task Owner, or be given administrative access to edit activity information.
Why don't I see Activity Center in the Platform?
If the Activity Center is part of your Reeher Subscription, your System Administrator will need to grant you access in the User Management Tool. If the Activity Center is not a part of your subscription, please contact your Customer Success Manager to discuss how to make this feature available for your institution.