Subscriptions allow users to schedule the delivery of query results to their email on a regular basis. Creating a subscription is as easy as clicking on the Subscribe button at the top of a query page or in the Queries list on the Targeter homepage. You can view all of the queries you are subscribed to by going to the My Subscribe Queries folder on the Targeter Homepage.
Subscribing
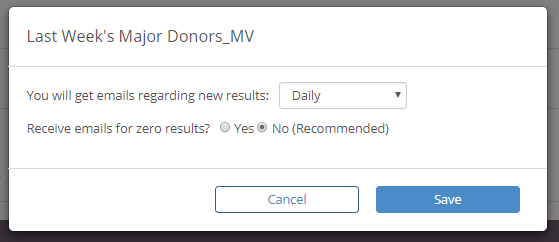
Users can subscribe to any user created query that is available to them. It is as simple as clicking on the Subscribe link at the top of a Saved Query or on the Queries Tab in the Targeter homepage. Then, you will open a dialogue box that will allow you to choose how often you would like to receive the emails:
- Daily
- Every Weekday
- Weekly - then choose which day(s) of the week to receive your subscription
- Monthly - Choose a specific day of the month to receive your subscription
You can also choose to receive the email even if the results are zero. The default selection is "No."
You will then receive your results emailed to you each morning for your selected times. The email will include a total of the results as well as a link to the full results detail in the Lists Tab. From here, you will also be able to add additional columns to the list, analyze the list in Crosstab, or look at the results using the Map View. The same columns that you last selected when last viewing/creating your query will automatically be available in your subscription results. You can also add additional columns or export this list by clicking on the blue Export button.
From the Subscriptions page you can also subscribe to additional Subscriptions by clicking on the Add Subscription button. In addition, you can also manage Subscriptions from this page where you are the originator, but have not subscribed to the Subscription. The Add Subscription dialogue box displays all active Subscriptions that are available to you. Subscriptions are created in Targeter, but you can subscribe to existing Subscriptions within this dialogue box. The columns found within the Add Subscription dialogue box include:
- Subscription Name – This is the name that the originator gave to the Subscription.
- Query Name – This column displays the name of the Targeter Query that the Subscription is associated with. This will allow you to find the query in Targeter to see the filters and parameters that have been set up that will determine the results to the query and Subscription.
- Frequency – This column indicates how frequently the report will be sent to you via email.
- Subscription Originator – This is the User that created the Subscription.
- Last Modified – This is the date the Subscription was last modified.
- Subscribers – This column displays the number of active users that have subscribed to the Subscription
- Actions – The actions allow you to subscribe; view properties of the Subscription; add or remove others from a Subscription; manage Subscription, or Delete Subscription.
Adding Subscribers
To add someone to a Subscription click on the blue subscriber count underneath the Subscription information. In this window, you can see all current subscribers as well as their subscription information. To add other subscribers, click the Add Subscribers button. This will open a dialogue box with a list of all active users. For users that have already subscribed to the Subscription you will see the check box under the Add as Subscriber column checked. To add a subscriber, check the box next to their name under the Add as Subscriber column. To remove a user, uncheck the box next to their name under the Add as Subscriber column. Once you’ve completed checking or unchecking the box, click on Ok at the bottom of the dialogue box to make the changes. Users will have the option to unsubscribe themselves from these emails.