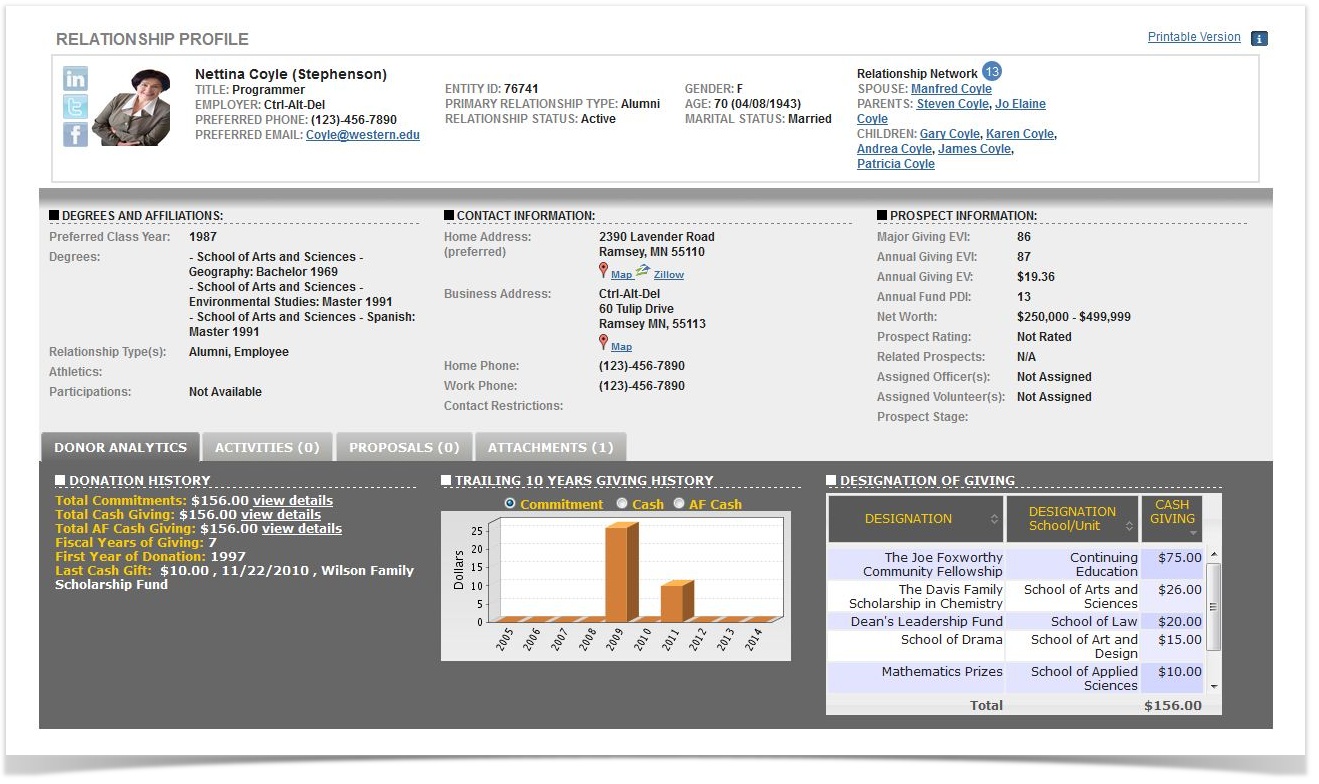
The Relationship Profile summarizes key information about a constituent and puts it in one place for you. Three primary sections make up the Relationship Profile.
Donor vitals and basic information can be found in the top section, where the essential information like name, preferred contact information, primary relationship type and status, gender, employment, age, marital status, and spouse information are displayed. In addition, the constituent's Relationship Network can also be viewed. This section displays the spouse, parents, and children of the constituent. The blue circle next to the Relationship Network displays the number of related constituents. You can click on the circle to see all the related constituents along with the type of relationship, the related constituents' school of graduation, and their class year.
The middle section is comprised of donor background & information, and shows:
- Degrees and affiliations - including preferred class year and participations.
- Contact information - including home and business addresses. Clicking on the "Map" or "Zillow" links, we take you to the address on Google Maps or Zillow.com.
- Prospect information - including the constituent’s Reeher Predictive Scores as well assignment information.
Finally, the third section shows Donor Activity and Interactions, by using four tabs:
- Donor Analytics - which features the constituents’ donation history and trends, a chart of the trailing 10 years of giving, and a table displaying the donors’ designations.
- Activities - which displays all officer contact and activities related to the constituent.
- Proposals - which displays all proposals related to the constituent.
- Attachments - which allows users to upload and share files of information with other users in regards to the constituent. In addition, you can also upload a picture of the constituent by using the functionality on the Attachments Tab. Simply upload your image then select the action called Save as Profile Picture. You can limit who has access to view the attachment by selecting the appropriate user or groups in the "Viewable by" menu.
All users will always have access to the content shown in top two sections of Relationship Profile, but the content provided in the Tabs of the Relationship Profile can be controlled through the Profile tool in Control Panel.
Frequently Asked Questions
How do the social media icons (e.g. Facebook, Twitter, and LinkedIn) work?
Any user with access to the Relationship Profile can add or edit a link to the constituent's social media pages. Click on the LinkedIn, Twitter, or Facebook icon to open a dialogue box where you can paste and save the appropriate URL. Once the URL is saved then users can click on these links to go directly to the constituent's social media pages.
If your institution collects and stores the URLs to your constituent records’ social media profiles then this feature can be enabled for you by supplying and additional file in your data feed. Please contact support@reeher.net to learn more.
How do add or edit a picture of the constituent to the Relationship Profile?
Hover over the space provided for a picture in the upper left-hand corner of the Relationship Profile and click on that space to add a picture. This will bring up a dialogue box that will allow you to add an image by by clicking on the Add Picture button. Then browse your computer to select the image file. Once it appears within the dialogue box then you can click on the Submit button and the picture will appear in the Relationship Profile. This action will also add the image as an attachment and save it within the Attachments tab within Relationship Profile.
Click on the existing picture to remove or replace the existing picture that has been saved to the Relationship Profile. This will open a dialogue box that displays the current picture. You can then add another picture which will replace the existing picture and add the new picture to the Attachments tab. If you first decide to delete the picture it will remove it from the Reeher Platform and will no longer be found in the Attachments tab.
You can also manage the picture of the constituent by using the functionality on the Attachments Tab. Simply upload your image then select the action called Save as Profile Picture.