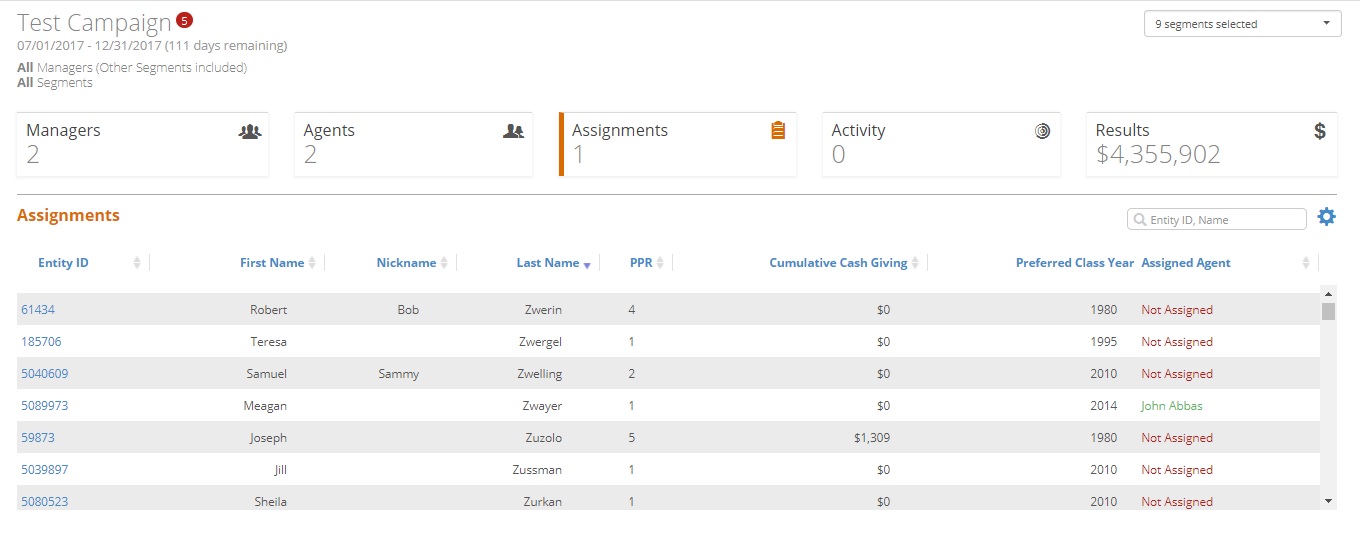
In this section, we will walk through using Blackbaud Volunteer Network Fundraising to Create a Campaign in the Platform. If you are just getting started with the tool, you can utilize this document to create a test campaign. The test campaign can be deleted once it has been created, so setting up a sample campaign will help you get comfortable with this workflow.
Creating a New Campaign
- Navigate to the Volunteer Network Fundraising layer of the Platform (see this page on granting access to the Layer)
- Click on the icon in the drawer and click on Add Campaign. As time goes on, this menu tray in the drawer will include any current and previous campaigns for you to view as well.
- Click on +Create new to launch the Campaign Creation Wizard. Once you have additional campaigns created, you will also have the option to copy an existing campaign.
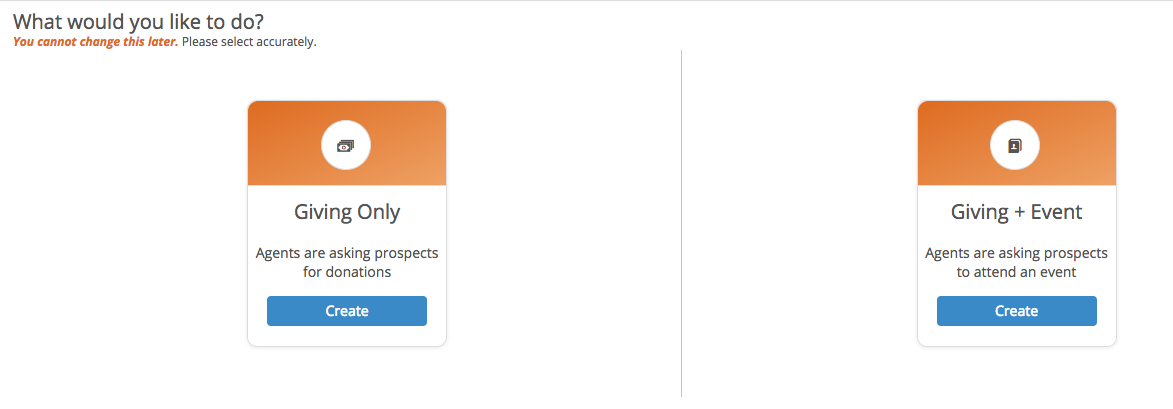
Type of Campaign
Campaigns can be one of two types: Giving Only or Giving + Event.
- With a Giving Only campaign, your agents will only be responsible for reporting whether their prospects plan to donate or not.
- With a Giving + Event campaign, your agents will report both whether their prospects intend to give and if they plan to attend a specific event.
Currently, this system does not support event only campaigns.
Once selected, the type of campaign cannot be changed.
Campaign Details - These are the initial details for this campaign. Note that any field with a red * is required.
- Campaign Name: Enter in a unique name for the campaign
- Start Date: The day the campaign officially starts
- Stop Date: Day that the campaign ends. Once the campaign passes the Stop Date, the Platform will indicate that it is overdue and needs to officially be closed.
- Event Name/Event Date (Giving + Event campaigns only): The name of the event associated with this campaign and when it takes place. The name will be displayed to agents in the agent portal.
- How should volunteers and prospects be segmented?: Use this to select how you want your volunteers to be grouped in this campaign. To start with, you will be able to segment by Preferred Class Year, Athletics, or any custom column of data Reeher has built for your institution. Ideally it is a commonality that your volunteers will share with their assignments such as the class year. Note that once the campaign is created, the segmentation cannot be changed.
- Click Let's Begin
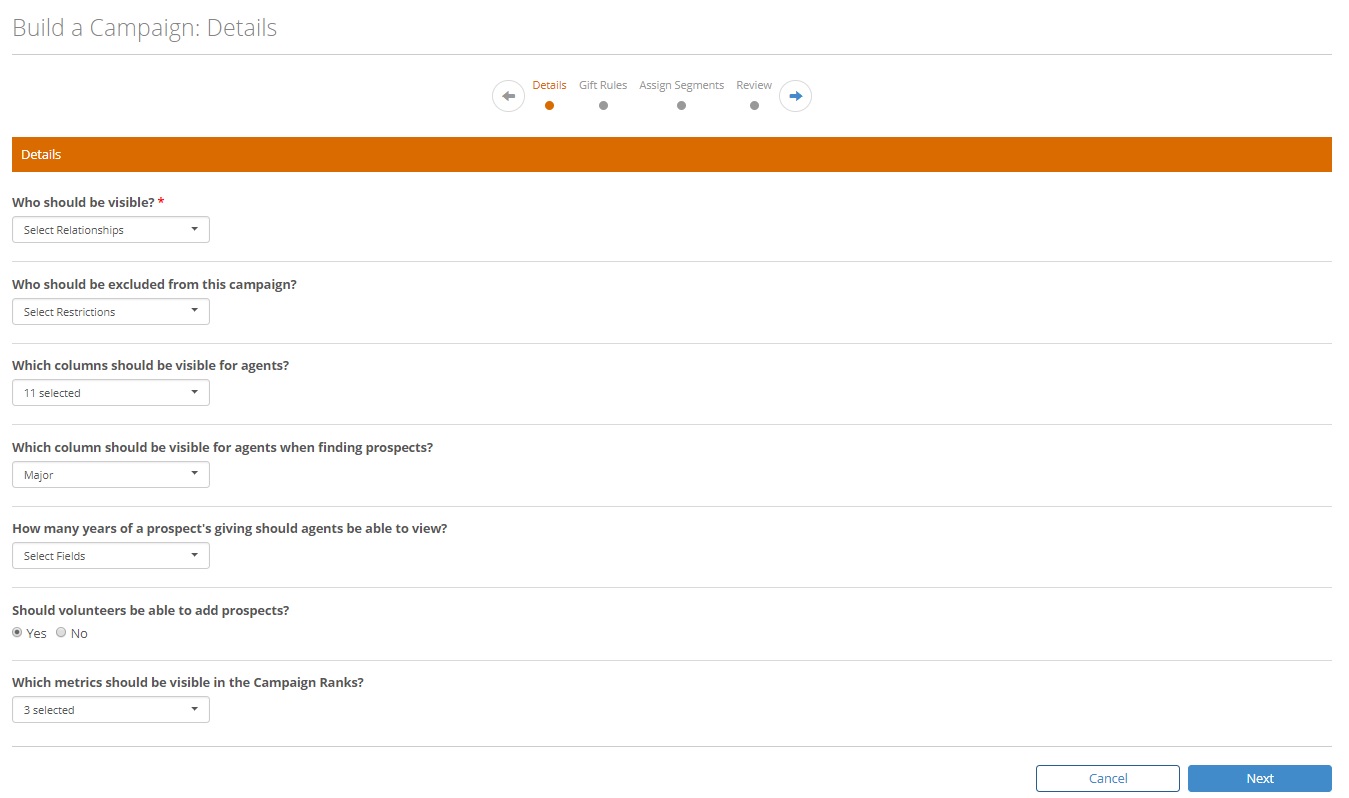
The next page allows you to select options for what is visible for your volunteers in the Volunteer Portal. The settings can be changed once the campaign has been created. We will move through the options left to right.
- Who should be visible in this campaign?
- Select the appropriate types of constituents. For this example, select Alumni.
- Who should be excluded from this campaign?
- Allows you to limit who is available to volunteers to add as prospects. Select any contact restrictions that apply, such as Do Not Mail, or constituents who are already assigned to gift officers. These settings can be over-ridden by Managers when creating volunteers and assignments.
- What columns will be visible for agents in this campaign?
- You are able to make any of the listed columns of data available to your volunteers in the Volunteer Portal. When they view their assigned prospects, this information will be made available to them on the profile.
- What column should be visible for agents when finding prospects?
- Major is the default and is fine for this example. This selection will display a prospect's major, which is a frequent way to find commonality or connections between your volunteers or prospects.
- How many years of giving should agents be able to view on prospects?
- This will determine how much of an assignment's giving history should display to the volunteers. This will be shown cumulatively for each FY. Individual gifts will not be shown. Select either 5, 10, or Do not display.
- Should volunteers be able to add prospects?
- Check to allow your volunteers the ability to find and assign their own prospects within the Volunteer Portal. Volunteers will only be able to select from other constituents in their own segment (like Class Year) and who are not restricted by your selections from Step 2.
- Which metrics should be visible in Campaign Ranks?
- You are able to choose from Overall donors, dollars, participation rate, Annual Giving donors, dollars and participation rate, or Campaign donors, dollars and participation rate. These metrics will be visible to volunteers in the Volunteer Portal.
- Click Next
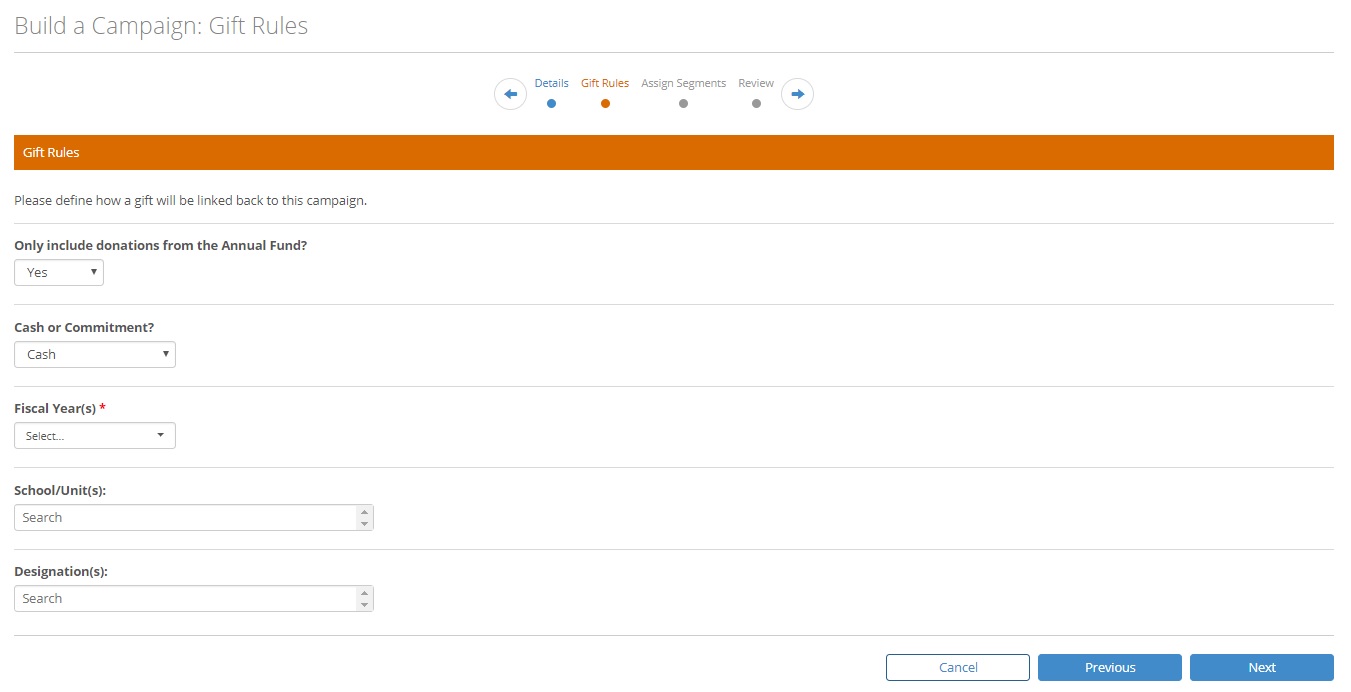
Set your Gift Rules on the next screen. Here you will define how a gift will be linked back to this campaign. Reeher uses the information provided via your nightly data feed to link those gifts via the terms you set on this screen. We then use that information to report progress back to the volunteers.
- Only include donations from the Annual Giving?
- Should Reeher only use gifts that have been identified as Annual Giving gifts in totals for this campaign instead of using all gifts? Answer yes or no.
- Cash or Commitment?
- Choose whether to count Cash (Outright gifts, pledge payments, etc.) or Commitments (Outright gifts, pledges, but NO pledge payments, etc.) transactions toward this campaign.
- Fiscal Year(s)
- Select which fiscal year(s) gifts to this campaign should be counted from.
- School/Unit(s)
- Click to select the school/unit(s) of designations on transactions that will be counted as gifts to this campaign. Click once to get the drop-down menu to make a selection. You can continue this process to select multiple school/units. If this field is left blank, gifts to any school or unit will be included that matches any of the other selections above.
- Designation(s)
- Use this to identify specific designations that should be used when attributing gifts to this campaign. Click into the field and type to begin a search on all of your specific designations.
- Click Next.
Assign Segments
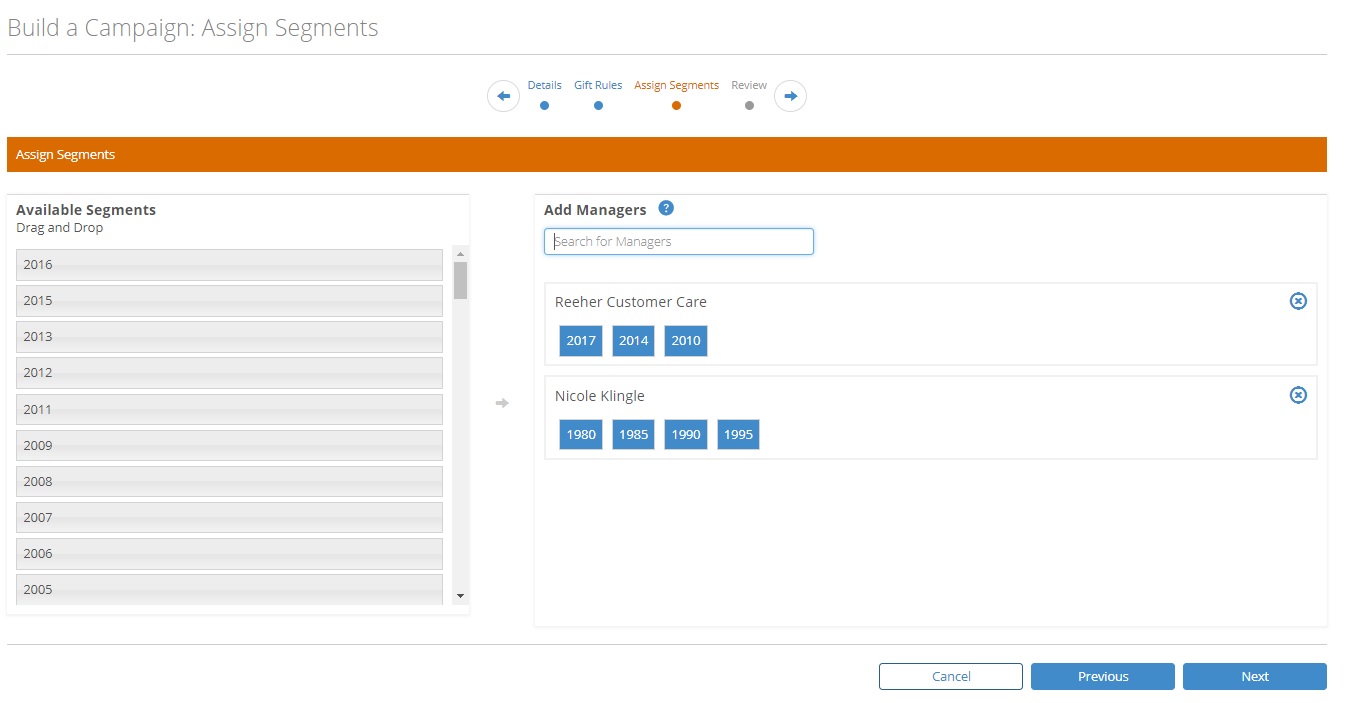
In this screen, you will add managers (staff) to the campaign and assign the segments for which they will be responsible. For example, you might have some managers responsible for specific Class Years, and others managing a group of non-reunion years.
- Add Manager
- Search through managers by clicking in the search bar and choosing from the drop-down list, or start typing to search by the name. When you find the individual you are looking for, click on their name to add them as a manager to the campaign. Note that only Reeher Platform users who have access to Class Agent are available to add as a manager.
- Available Segments
- Click and drag segments from this menu on the left to the appropriate manager on the right.
- Click Next when you've completed adding the managers and segments. Note that managers and segments can be changed once the campaign has been created.
Review Campaign
- Review your campaign's information and verify the information entered is correct. If you need to change anything, use the Previous button to go back to previous screens to edit. When complete click Submit.
Congratulations! You have successfully created a campaign. If you assigned yourself as a manager, you will receive an email like the one you see below that includes a link to the campaign. Any other staff that you designate as managers of campaigns will receive a similar email.
Add Resources
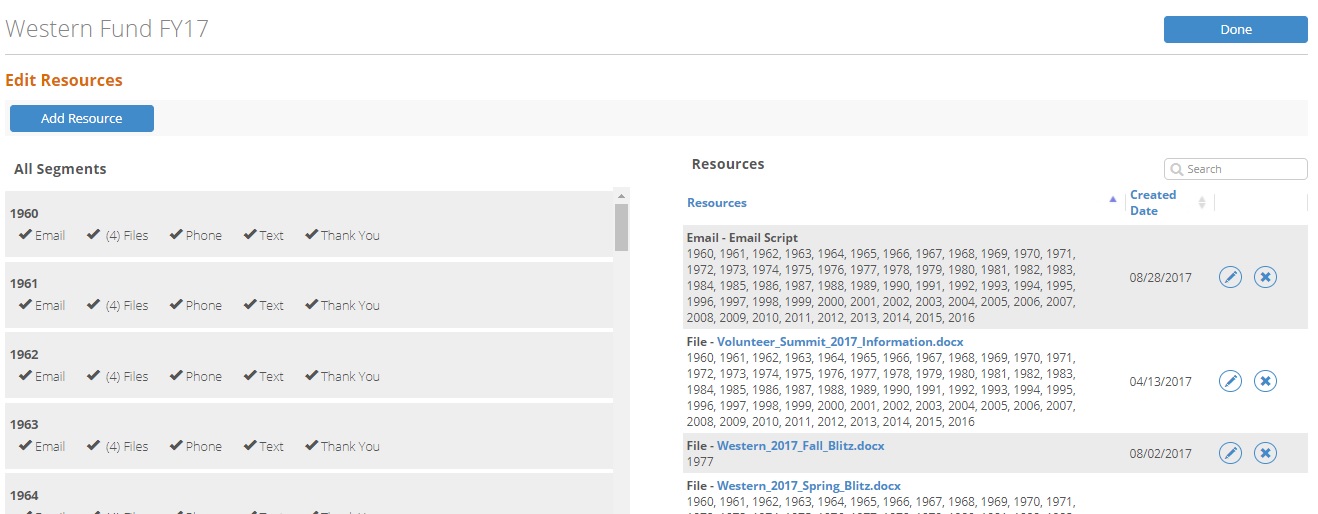
Create and add Resources for your volunteers, such as scripts or files, to the campaign. Note that these resources can be added after the campaign has been created as well.
- Edit Resource
- Click Edit Resource from the drawer to begin adding a resource for your Class Agents.
- Click the blue Add Resource button at the top of the page.
- Type
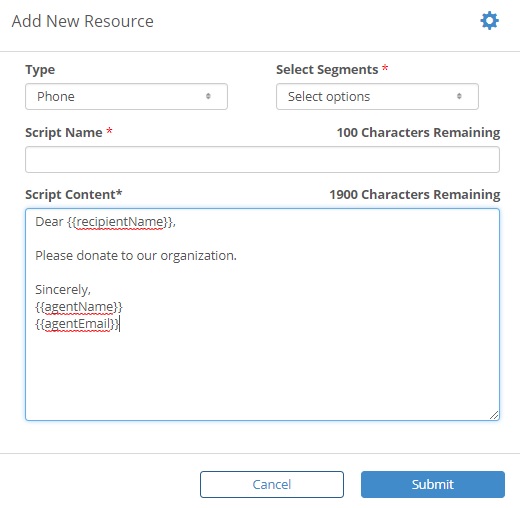
- Choose which type of resource to add. We have several script types (Letter/Email, Phone, Text, or Thank You) or you can upload a File.
- File: Click the blue button to browse your computer and upload a resource. These will be visible to all agents who are part of this campaign. If you upload a file with the same file name, it will overwrite the existing file.
- To upload a file, the following conditions must be met:
- File must be less than 15MB
- File must be one of the following accepted types: jpg, jpeg, png, doc, docx, xls, xlsx, ppt, pptx, csv, txt
- Script
- Select Segment: Choose the segments that this script or file should be available for. You can select single or multiple segments or all of them. Note that each segment can only have one script per type at a time. So, for example, the Class of 1999 can only have one phone script per campaign.
- Script Name: Identifying name for the script, such as Phone Script 1990s.
- Script Subject: Only available for Email and Thank You scripts, this field is what will fill in as the subject line of the email.
- Script Content: Enter the content of the script here. In the case of emails and texts, your volunteers will be able to edit the content to personalize before sending, but you are providing them with a great place to start. To include custom name or emails in the template, please use the following merge fields:
- {{recipientName}} - Name of the person the message will be sent to.
{{agentName}} - Agent's name
{{agentEmail}} - Agent's email
- Submit when completed.
- Choose which type of resource to add. We have several script types (Letter/Email, Phone, Text, or Thank You) or you can upload a File.
- Once the resources have been added, click Done.
Bulk Upload Agents/Assignments
You are able to bulk upload a spreadsheet of your volunteers and assignments here. Some things to note:
- The volunteer entity ID needs to be the first column
- If you are uploading assignments, the assigned prospect's Entity ID needs to be the second column.
- Please be sure your file has a header row with both columns labeled Entity ID or ID.
EXAMPLE FILE:
| Entity ID | Entity ID |
|---|---|
| A0001 | E0006 |
| A0001 | E0073 |
| A0005 | E0914 |
| A0215 | E0165 |
Managers who have been added to the campaign will now see the Welcome Page that will begin to walk them through the campaign. Now that you have defined a sample campaign, the next phase of set up is to assign your volunteers to the campaign, and then give each of those volunteers a list of Prospects to contact.
- Add Agents: Manually assign volunteers and prospects to your campaign.
- In the Search box begin typing a name of one of your volunteers. Click Add to add the volunteer to your campaign. You can assign any constituent as an agent (volunteer) in the campaign, but if they don't have an email address you will not be able to activate them.
- Continue to search and add constituents as agents. Remove any agent from the table below with the red X.
- Click Next
- Add Constituents: In this step you can assign prospects from your constituent base to your volunteers.
- Review the list of constituents that appears, based on the segmentation assigned as the manager. By default, the list sorts by AF EVI, putting your top annual giving prospects at the top of the list for assignment. You can also search for specific constituents using the search bar at the top right of the table.
- To assign, click on Not Assigned in the right hand column. The Platform will search for the volunteer whose segment matches that of the constituent and put them at the top of the list. Find the appropriate agent and click +Assign.
- When you are finished assigning prospects to volunteers, click Next.
| Important! Look at the email address of the volunteers you have added. Later, when we 'Activate' the volunteers, they will receive an email at the address listed here. If you are using this guide to TEST, you probably do not actually want your volunteers to receive an email, so we recommend initially using other employees assigned to the campaign to help test. Or, you can use the simulation feature outlined below. |
